Functions in Braintrust are atomic, reusable building blocks for executing AI-related logic. Functions are hosted and remotely executed in a performant serverless environment and are fully intended for production use. Functions can be invoked through the REST API, SDK, or UI, and have built-in support for streaming and structured outputs. Function types:Documentation Index
Fetch the complete documentation index at: https://braintrust.dev/docs/llms.txt
Use this file to discover all available pages before exploring further.
- Prompts: LLM prompts with model configuration and templating (see Deploy prompts)
- Tools: General-purpose code that LLMs can invoke to perform operations or access external data
- Scorers: Functions for evaluating LLM output quality (returning a number from 0 to 1)
- Workflows: Chains of two or more prompts for multi-step workflows
- Parameters: Configuration schemas for evaluations with runtime values (see Write parameters)
Security: For Braintrust-hosted deployments and self-hosted deployments on AWS, run in isolated AWS Lambda environments within a dedicated VPC that has no access to internal infrastructure. See code execution security for details.
Composability
Functions can be composed together to produce sophisticated applications without complex orchestration logic.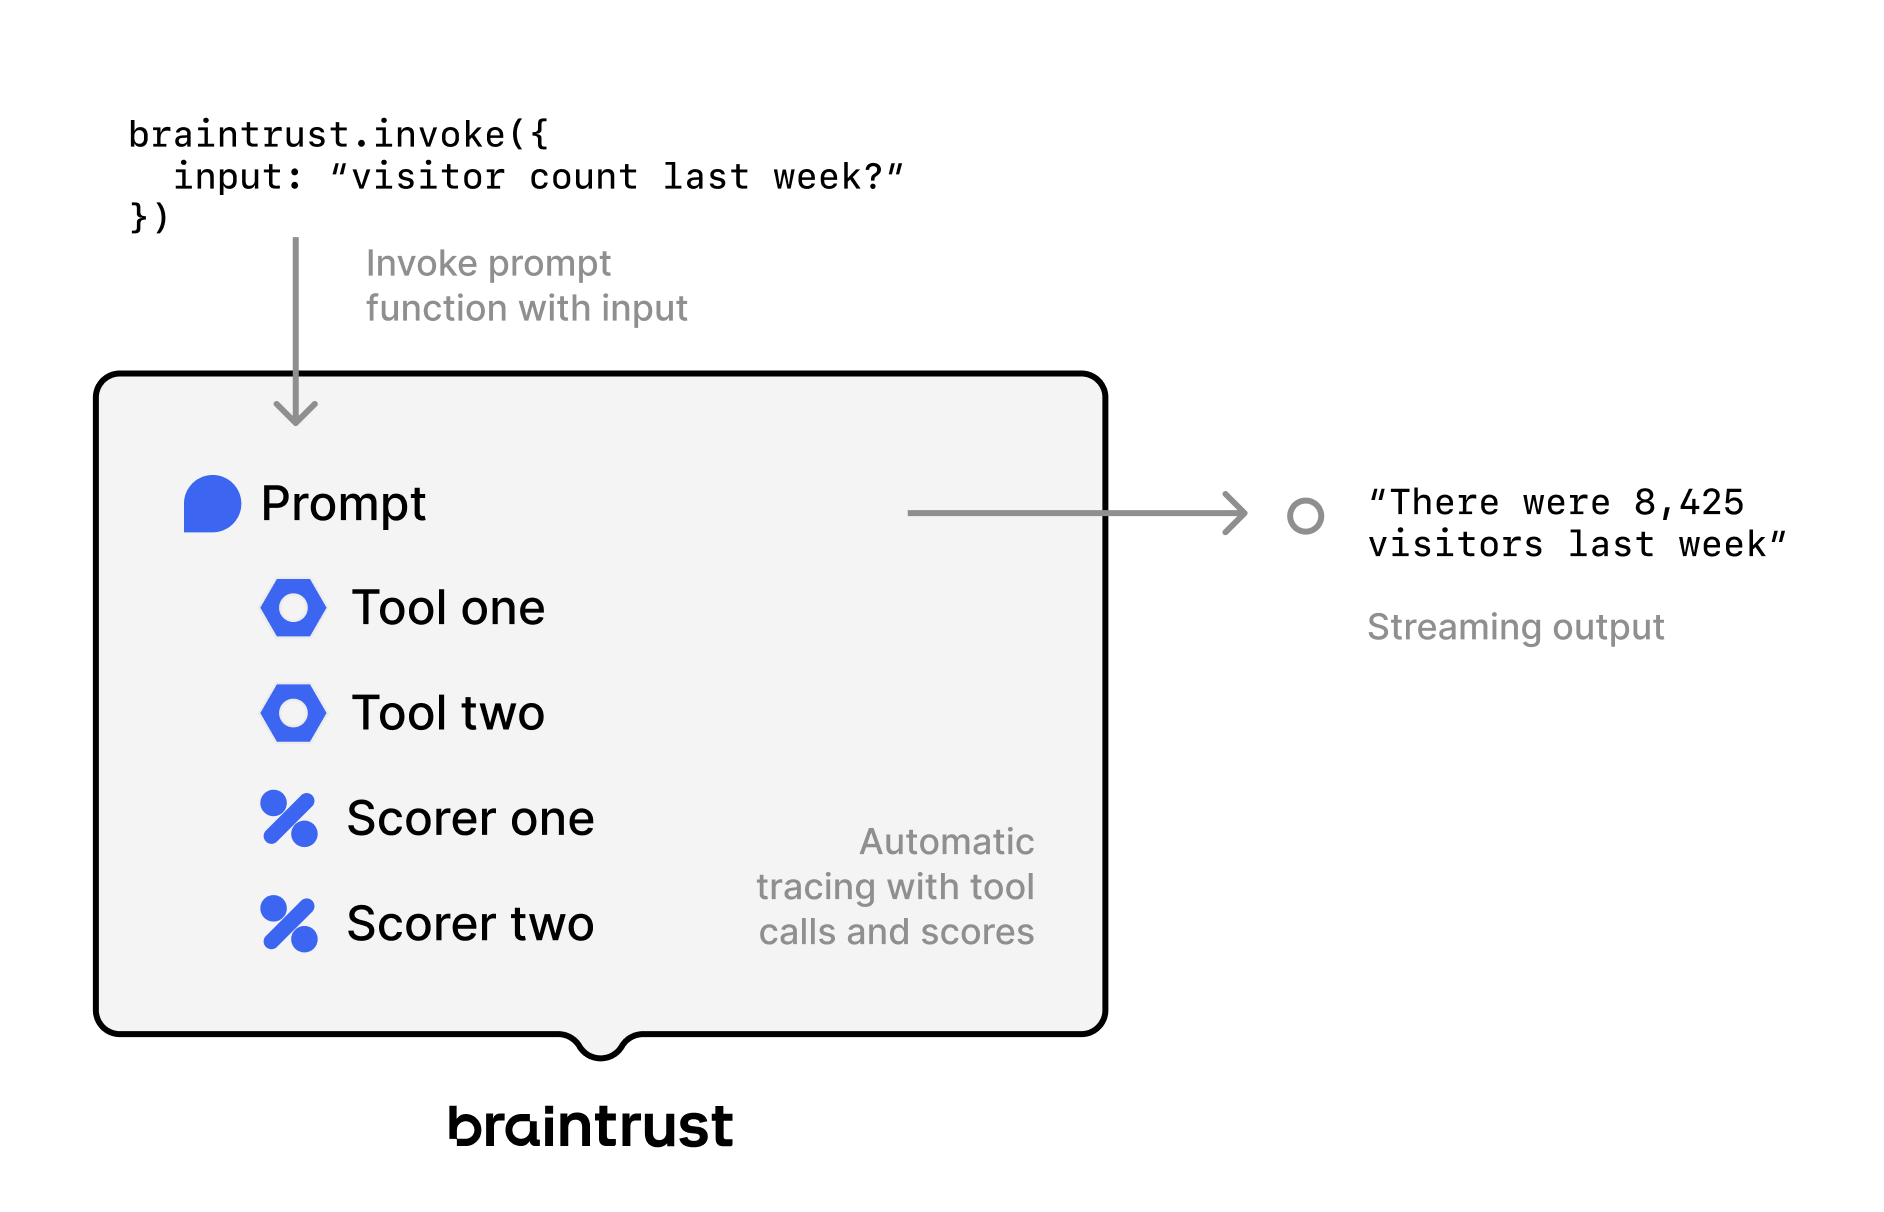 In this diagram, a prompt is being invoked with an input and calls two different tools and scorers to ultimately produce a streaming output. Out of the box, you also get automatic tracing, including the tool calls and scores.
Any function can be used as a tool. For example, a RAG agent can be defined as just two components:
In this diagram, a prompt is being invoked with an input and calls two different tools and scorers to ultimately produce a streaming output. Out of the box, you also get automatic tracing, including the tool calls and scores.
Any function can be used as a tool. For example, a RAG agent can be defined as just two components:
- A vector search tool that embeds a query, searches for relevant documents, and returns them
- A system prompt with instructions for how to retrieve content and synthesize answers using the tool
Deploy tools
Tools are functions that LLMs can call to perform complex operations or access external data. Create tools in code and push them to Braintrust:- TypeScript
- Python
View and manage tools
Go to Tools to view all deployed tools in your project. Use Filter or the search bar to find specific tools. Click a tool to view its code. To test the tool, enterinput data and click Test. You can also invoke a function directly from the terminal using bt functions invoke:
Add tools to prompts
Once deployed, you can add tools to prompts in the UI or via code. See Add tools for more details.Call tools directly
Call tools via the API without going through a prompt:Deploy scorers
Scorers evaluate the quality of LLM outputs. Braintrust supports three types:- Autoevals: Pre-built scorers for common tasks like factuality and semantic similarity.
- LLM-as-a-judge: Evaluate outputs using a language model and natural language criteria.
- Custom code: Write TypeScript or Python scoring logic for rule-based or calculation-based checks.
bt functions push, or create them directly in the UI. See Scorers for details.
Deploy workflows
Workflows chain multiple prompts together into workflows. Create workflows in playgrounds:- Navigate to Playgrounds
- Click + Workflow
- Add prompt nodes by selecting + in the comparison pane
- Use template variables to pass data between prompts:
{{dataset.input}}- Access dataset inputs{{input}}- Access previous prompt’s output{{input.field}}- Access structured output fields
- Save the agent
Invoke functions
Functions can be invoked through the REST API, SDK, CLI, or UI. When invoking a function, you can reference it by:- Slug: The unique identifier within a project for any function type (e.g.,
slug: "calculator") - Global function name: Built-in Braintrust scorers only - globally unique functions like
Factualityfrom autoevals
- Slug
- Global function name
Reference a function by its slug within a specific project:
Version functions
Like prompts, functions are automatically versioned. Pin specific versions in code:Sync with the CLI
Sync functions between the Braintrust UI and your local codebase using thebt CLI.
-
Push to Braintrust: Push changes from your codebase to the UI using
bt functions push. You can push one or more files. -
Pull from Braintrust: Pull changes from the UI to your codebase using
bt functions pull:Usepullto:- Download functions from public projects so others can use them
- Vendor a specific function version into your codebase so it runs locally without fetching it from Braintrust at runtime
- Review changes to functions in pull requests
bt functions for the full flag reference.
Handle dependencies
Braintrust automatically bundles your code with any libraries and dependencies for serverless execution. Once code is bundled and uploaded to Braintrust, you cannot edit it directly in the UI. Any changes must be made locally in your codebase and pushed viabt functions push.
-
TypeScript: Braintrust uses
esbuildto bundle your code. Bundling creates a single JavaScript file containing all necessary code, reducing the risk of version mismatches and dependency errors when deploying functions. The Braintrust SDK (braintrust,autoevals,@braintrust/*) is bundled into the archive automatically. Sinceesbuildstatically analyzes your code, it cannot handle:- Dynamic imports
- Runtime code modifications
- Native libraries like SQLite
- Python: Braintrust uses uv to cross-bundle dependencies to the target platform (Linux). The Braintrust SDK is vendored into the archive automatically. This works for most binary dependencies, except for libraries that require on-demand compilation. If you encounter bundling issues, file an issue on GitHub for our JavaScript/TypeScript or Python SDKs.
Use the REST API
Call any function via HTTP.In the examples below, organizations on the EU data plane should replace
api.braintrust.dev with api-eu.braintrust.dev.Function features
All functions in Braintrust support:- Well-defined parameters and return types: Type-safe interfaces using Zod (TypeScript) or Pydantic (Python)
- Streaming and non-streaming invocation: Handle real-time and batch operations
- Automatic tracing and logging: All function calls are traced in Braintrust
- OpenAI argument format: Prompts can be loaded directly in OpenAI-compatible format
- Version control: Functions are automatically versioned with each deployment
Organize functions
Functions are organized into projects using theprojects.create() method. This method returns a handle to the project (creating it if it doesn’t exist) that you can use to create tools, prompts, and scorers:
If a project already exists,
projects.create() returns a handle to it. There is no separate .get() method.Create custom table views
The Tools and Scorers pages support custom table views to save your preferred filters, column order, and display settings. To create or update a custom table view:- Apply the filters and display settings you want.
- Open the menu and select Save view… or Save view as….
Custom table views are visible to all project members. Creating or editing a table view requires the Update project permission.
Set default table views
You can set default views at two levels:- Organization default: Visible to all members when they open the page. This applies per page — for example, you can set separate organization defaults for Logs, Experiments, and Review. To set an organization default, you need the Manage settings organization permission (included by default in the Owner role). See Access control for details.
- Personal default: Overrides the organization default for you only. Personal defaults are stored in your browser, so they do not carry over across devices or browsers.
- Switch to the view you want by selecting it from the menu.
- Open the menu again and hover over the currently selected view to reveal its submenu.
- Choose Set as personal default view or Set as organization default view.
- Open the menu and hover over the currently selected view to reveal its submenu.
- Choose Clear personal default view or Clear organization default view.
Next steps
- Write scorers to create custom evaluation functions
- Deploy prompts that use your tools
- Monitor deployments to track function performance
- Manage environments to version functions across environments