Beyond basic tracing, Braintrust provides advanced capabilities for complex applications including distributed tracing, custom rendering, data masking, and performance tuning.

Annotate your code

You can add traces for multiple, specific functions in your code to your logs by annotating them with functional wrappers (TypeScript) or decorators and context managers (Python):
import { initLogger, wrapOpenAI, wrapTraced } from "braintrust";
import OpenAI from "openai";
import { ChatCompletionMessageParam } from "openai/resources";

const logger = initLogger({
  projectName: "My Project",
  apiKey: process.env.BRAINTRUST_API_KEY,
});

const client = wrapOpenAI(new OpenAI({ apiKey: process.env.OPENAI_API_KEY }));

// wrapTraced() automatically logs the input (args) and output (return value)
// of this function to a span. To ensure the span is named `answerQuestion`,
// you should name the inline function definition (inside of wrapTraced).
const answerQuestion = wrapTraced(async function answerQuestion(
  body: string,
): Promise<string> {
  const prompt: ChatCompletionMessageParam[] = [
    { role: "system", content: "You are a helpful assistant." },
    { role: "user", content: body },
  ];

  const result = await client.chat.completions.create({
    model: "gpt-4o",
    messages: prompt,
  });

  const content = result.choices[0].message.content;
  if (!content) {
    throw new Error("The LLM response content is empty or undefined.");
  }

  return content;
});

async function main() {
  const input = "How can I improve my productivity?";
  const result = await answerQuestion(input);
  console.log(result);
}

Add names to traces

You can add custom names to traces using the name parameter. If you don’t provide a name, the SDK will use the function name or “anonymous” if the function is unnamed.
// In TypeScript, you can use the `name` parameter in either `wrapTraced` or `traced()`.
import { wrapTraced } from "braintrust";

const myFunction = wrapTraced(
  async function (input) {
    return process(input);
  },
  { name: "Custom Span Name", type: "task" },
);

await logger.traced(
  async (span) => {
    span.log({ input: data });
    // Do work
    span.log({ output: result });
  },
  { name: "Custom Span Name", type: "task" },
);

Wrap LLM clients

Wrap OpenAI

For information about how to wrap OpenAI clients, check out the OpenAI provider docs.

Wrap Anthropic

For information about how to wrap Anthropic clients, check out the Anthropic provider docs.

Wrap Gemini

For information about how to wrap Google Gemini clients, check out the Gemini provider docs.

Wrap a custom LLM client

If you’re using your own client, you can wrap it yourself using the same conventions as the OpenAI wrapper. Check out the Python and TypeScript implementations for reference. To track the span as an LLM, include the following in your wrapper:
  • Specify the type as llm. You can specify any name you’d like. This enables LLM duration metrics.
  • Add prompt_tokens, completion_tokens, and tokens to the metrics field. This enables LLM token usage metrics.
  • To track cached tokens, log prompt_cached_tokens (cache reads) and prompt_cache_creation_tokens (cache writes) to metrics. By convention, prompt_tokens should include both prompt_cached_tokens and prompt_cache_creation_tokens. So if you have a request with 10 cache read tokens, 5 cache write tokens, and 3 uncached tokens, you should log prompt_tokens: 18.
  • Format the input as a list of messages (using the OpenAI format), and put other parameters (like model) in metadata. This enables the Try prompt button in the UI.
import { initLogger, traced, wrapTraced } from "braintrust";

const logger = initLogger({
  projectName: "My Project",
  apiKey: process.env.BRAINTRUST_API_KEY,
});

interface LLMCompletion {
  completion: string;
  metrics: {
    prompt_tokens: number;
    completion_tokens: number;
  };
}

async function callMyLLM(
  input: string,
  params: { temperature: number },
): Promise<LLMCompletion> {
  // Replace with your custom LLM implementation
  return {
    completion: "Hello, world!",
    metrics: {
      prompt_tokens: input.length,
      completion_tokens: 10,
    },
  };
}

export const invokeCustomLLM = wrapTraced(
  async function invokeCustomLLM(
    llmInput: string,
    params: { temperature: number },
  ) {
    return traced(async (span) => {
      const result = await callMyLLM(llmInput, params);
      const content = result.completion;
      span.log({
        input: [{ role: "user", content: llmInput }],
        output: content,
        metrics: {
          prompt_tokens: result.metrics.prompt_tokens,
          completion_tokens: result.metrics.completion_tokens,
          tokens:
            result.metrics.prompt_tokens + result.metrics.completion_tokens,
        },
        metadata: params,
      });
      return content;
    });
  },
  {
    type: "llm",
    name: "Custom LLM",
  },
);

export async function POST(req: Request) {
  return traced(async (span) => {
    const result = await invokeCustomLLM(await req.text(), {
      temperature: 0.1,
    });
    span.log({ input: req.body, output: result });
    return result;
  });
}

Trace distributed systems

When traces span multiple services or processes, you can export and resume traces across boundaries using the export() method.
import { currentSpan, initLogger, traced, wrapTraced } from "braintrust";

const logger = initLogger({ projectName: "my-project" });

// Client: Export the span
const processRequest = wrapTraced(async function processRequest(request) {
  return await fetch("/api/process", {
    method: "POST",
    body: request,
    headers: {
      "X-Trace-ID": await currentSpan().export(),
    },
  });
});

// Server: Resume the trace
async function handleRequest(req: Request) {
  const traceId = req.headers.get("X-Trace-ID");

  return await traced(
    async (span) => {
      const result = await processData(req.body);
      span.log({ input: req.body, output: result });
      return result;
    },
    { parent: traceId },
  );
}
This creates a continuous trace across service boundaries, making it easy to debug complex distributed systems.

Trace multimodal content

Upload attachments

In addition to text and structured data, Braintrust also supports uploading file attachments (blobs). This is especially useful when working with multimodal models, which can require logging large image, audio, or video files. You can also use attachments to log other unstructured data related to your LLM usage, such as a user-provided PDF file that your application later transforms into an LLM input. To upload an attachment, create a new Attachment object to represent the file on disk or binary data in memory to be uploaded. You can place Attachment objects anywhere in the event to be logged, including in arrays/lists or deeply nested in objects. See the TypeScript or Python SDK reference for usage details.
import { Attachment, initLogger } from "braintrust";

const logger = initLogger({ projectName: "Attachment Example" });

logger.log({
  input: {
    question: "What is this?",
    context: new Attachment({
      data: "path/to/input_image.jpg",
      filename: "user_input.jpg",
      contentType: "image/jpeg",
    }),
  },
  output: "Example response.",
});
The SDK uploads the attachments separately from other parts of the log, so the presence of attachments doesn’t affect non-attachment logging latency. Screenshot of attachment list in Braintrust Image, audio, video, and PDF attachments can be previewed in Braintrust. All attachments can be downloaded for viewing locally.

Use external files as attachments

The ExternalAttachment feature is supported only in self-hosted deployments. It is not supported in Braintrust-hosted environments.
Braintrust also supports references to files in external object stores with the ExternalAttachment object. You can use this anywhere you would use an Attachment. See the Attachments guide for more information.

Upload large traces

Braintrust has a 6MB limit on individual logging upload requests. However, you may need to log larger data structures, such as lengthy conversation transcripts, extensive document sets, or complex nested objects. The JSONAttachment allows you to upload JSON data inline, and it will automatically get converted to an Attachment behind the scenes. When you use JSONAttachment, your JSON data is:
  • Uploaded separately as an attachment, bypassing the 6MB trace limit
  • Not indexed, which saves storage space and speeds up ingestion, but not available for search or filtering
  • Still fully viewable in the UI with all the features of the JSON viewer (collapsible nodes, syntax highlighting, etc.)
This approach is ideal for data that you want to preserve for debugging but don’t need to search across traces.
import { JSONAttachment, initLogger } from "braintrust";

const logger = initLogger({ projectName: "Large Trace Example" });

// Example: Large document collection
const documents = Array.from({ length: 500 }, (_, i) => ({
  id: `doc_${i}`,
  title: `Document ${i}`,
  content: `This is a long document with lots of text content...`.repeat(100),
  metadata: {
    author: `Author ${i % 20}`,
    created_at: new Date(Date.now() - i * 3600000).toISOString(),
    tags: [`tag_${i % 10}`, `category_${i % 5}`],
    embeddings: Array.from({ length: 768 }, () => Math.random()),
  },
}));

logger.log({
  input: {
    query: "Find documents about machine learning",
    search_context: new JSONAttachment(documents, {
      filename: "document_collection.json",
      pretty: true, // Optional: pretty-print the JSON
    }),
    search_params: {
      limit: 10,
      similarity_threshold: 0.8,
    },
  },
  output: {
    results: documents.slice(0, 10).map((d) => ({ id: d.id, title: d.title })),
    total_searched: documents.length,
  },
  metrics: {
    search_duration_ms: 1250,
    documents_processed: documents.length,
  },
});

// Example: Complex nested configuration
const systemConfig = {
  models: Array.from({ length: 50 }, (_, i) => ({
    id: `model_${i}`,
    name: `Model ${i}`,
    parameters: {
      temperature: Math.random(),
      max_tokens: 1000 + i * 100,
      top_p: 0.9,
      frequency_penalty: Math.random() * 0.5,
      presence_penalty: Math.random() * 0.5,
    },
    performance_metrics: {
      latency_p50: Math.random() * 1000,
      latency_p95: Math.random() * 2000,
      latency_p99: Math.random() * 3000,
      success_rate: 0.95 + Math.random() * 0.05,
    },
  })),
  prompts: Array.from({ length: 100 }, (_, i) => ({
    id: `prompt_${i}`,
    template: `System prompt template ${i} with lots of instructions...`.repeat(
      50,
    ),
    version: `v${i}.0.0`,
    test_cases: Array.from({ length: 20 }, (_, j) => ({
      input: `Test input ${j}`,
      expected: `Expected output ${j}`,
    })),
  })),
};

logger.log({
  input: {
    experiment_name: "model_comparison",
    config: new JSONAttachment(systemConfig, {
      filename: "experiment_config.json",
    }),
  },
  output: {
    best_model: "model_42",
    summary: "Completed comparison of 50 models across 100 prompts",
  },
});
To log an external image, provide an image URL, an external object store URL, or a base64 encoded image as a string. The tree viewer will automatically render the image. Image logging The tree viewer will look at the URL or string to determine if it is an image. If you want to force the viewer to treat it as an image, nest it in an object like this:
{
  "image_url": {
    "url": "https://example.com/image.jpg"
  }
}
Base64 images must be rendered in URL format, just like the OpenAI API.
data:image/png;base64,iVBORw0KGgoAAAANSUhEUgAAABgAAAAYCAYAAADgdz34AAAABHNCSVQICAgIfAhkiAAAAAlwSFlzAAAApgAAAKYB3X3/OAAAABl0RVh0U29mdHdhcmUAd3d3Lmlua3NjYXBlLm9yZ5vuPBoAAANCSURBVEiJtZZPbBtFFMZ/M7ubXdtdb1xSFyeilBapySVU8h8OoFaooFSqiihIVIpQBKci6KEg9Q6H9kovIHoCIVQJJCKE1ENFjnAgcaSGC6rEnxBwA04Tx43t2FnvDAfjkNibxgHxnWb2e/u992bee7tCa00YFsffekFY+nUzFtjW0LrvjRXrCDIAaPLlW0nHL0SsZtVoaF98mLrx3pdhOqLtYPHChahZcYYO7KvPFxvRl5XPp1sN3adWiD1ZAqD6XYK1b/dvE5IWryTt2udLFedwc1+9kLp+vbbpoDh+6TklxBeAi9TL0taeWpdmZzQDry0AcO+jQ12RyohqqoYoo8RDwJrU+qXkjWtfi8Xxt58BdQuwQs9qC/afLwCw8tnQbqYAPsgxE1S6F3EAIXux2oQFKm0ihMsOF71dHYx+f3NND68ghCu1YIoePPQN1pGRABkJ6Bus96CutRZMydTl+TvuiRW1m3n0eDl0vRPcEysqdXn+jsQPsrHMquGeXEaY4Yk4wxWcY5V/9scqOMOVUFthatyTy8QyqwZ+kDURKoMWxNKr2EeqVKcTNOajqKoBgOE28U4tdQl5p5bwCw7BWquaZSzAPlwjlithJtp3pTImSqQRrb2Z8PHGigD4RZuNX6JYj6wj7O4TFLbCO/Mn/m8R+h6rYSUb3ekokRY6f/YukArN979jcW+V/S8g0eT/N3VN3kTqWbQ428m9/8k0P/1aIhF36PccEl6EhOcAUCrXKZXXWS3XKd2vc/TRBG9O5ELC17MmWubD2nKhUKZa26Ba2+D3P+4/MNCFwg59oWVeYhkzgN/JDR8deKBoD7Y+ljEjGZ0sosXVTvbc6RHirr2reNy1OXd6pJsQ+gqjk8VWFYmHrwBzW/n+uMPFiRwHB2I7ih8ciHFxIkd/3Omk5tCDV1t+2nNu5sxxpDFNx+huNhVT3/zMDz8usXC3ddaHBj1GHj/As08fwTS7Kt1HBTmyN29vdwAw+/wbwLVOJ3uAD1wi/dUH7Qei66PfyuRj4Ik9is+hglfbkbfR3cnZm7chlUWLdwmprtCohX4HUtlOcQjLYCu+fzGJH2QRKvP3UNz8bWk1qMxjGTOMThZ3kvgLI5AzFfo379UAAAAASUVORK5CYII=
If your image’s URL does not have a recognized file extension, it may not get rendered as an image automatically. In this case, you can use an inline attachment to force it to be rendered as an image. Screenshot of inline attachment

Trace errors

When you run:
  • Python code inside of the @traced decorator or within a start_span() context
  • TypeScript code inside of traced (or a wrappedTraced function)
Braintrust will automatically log any exceptions that occur within the span. Error tracing Under the hood, every span has an 
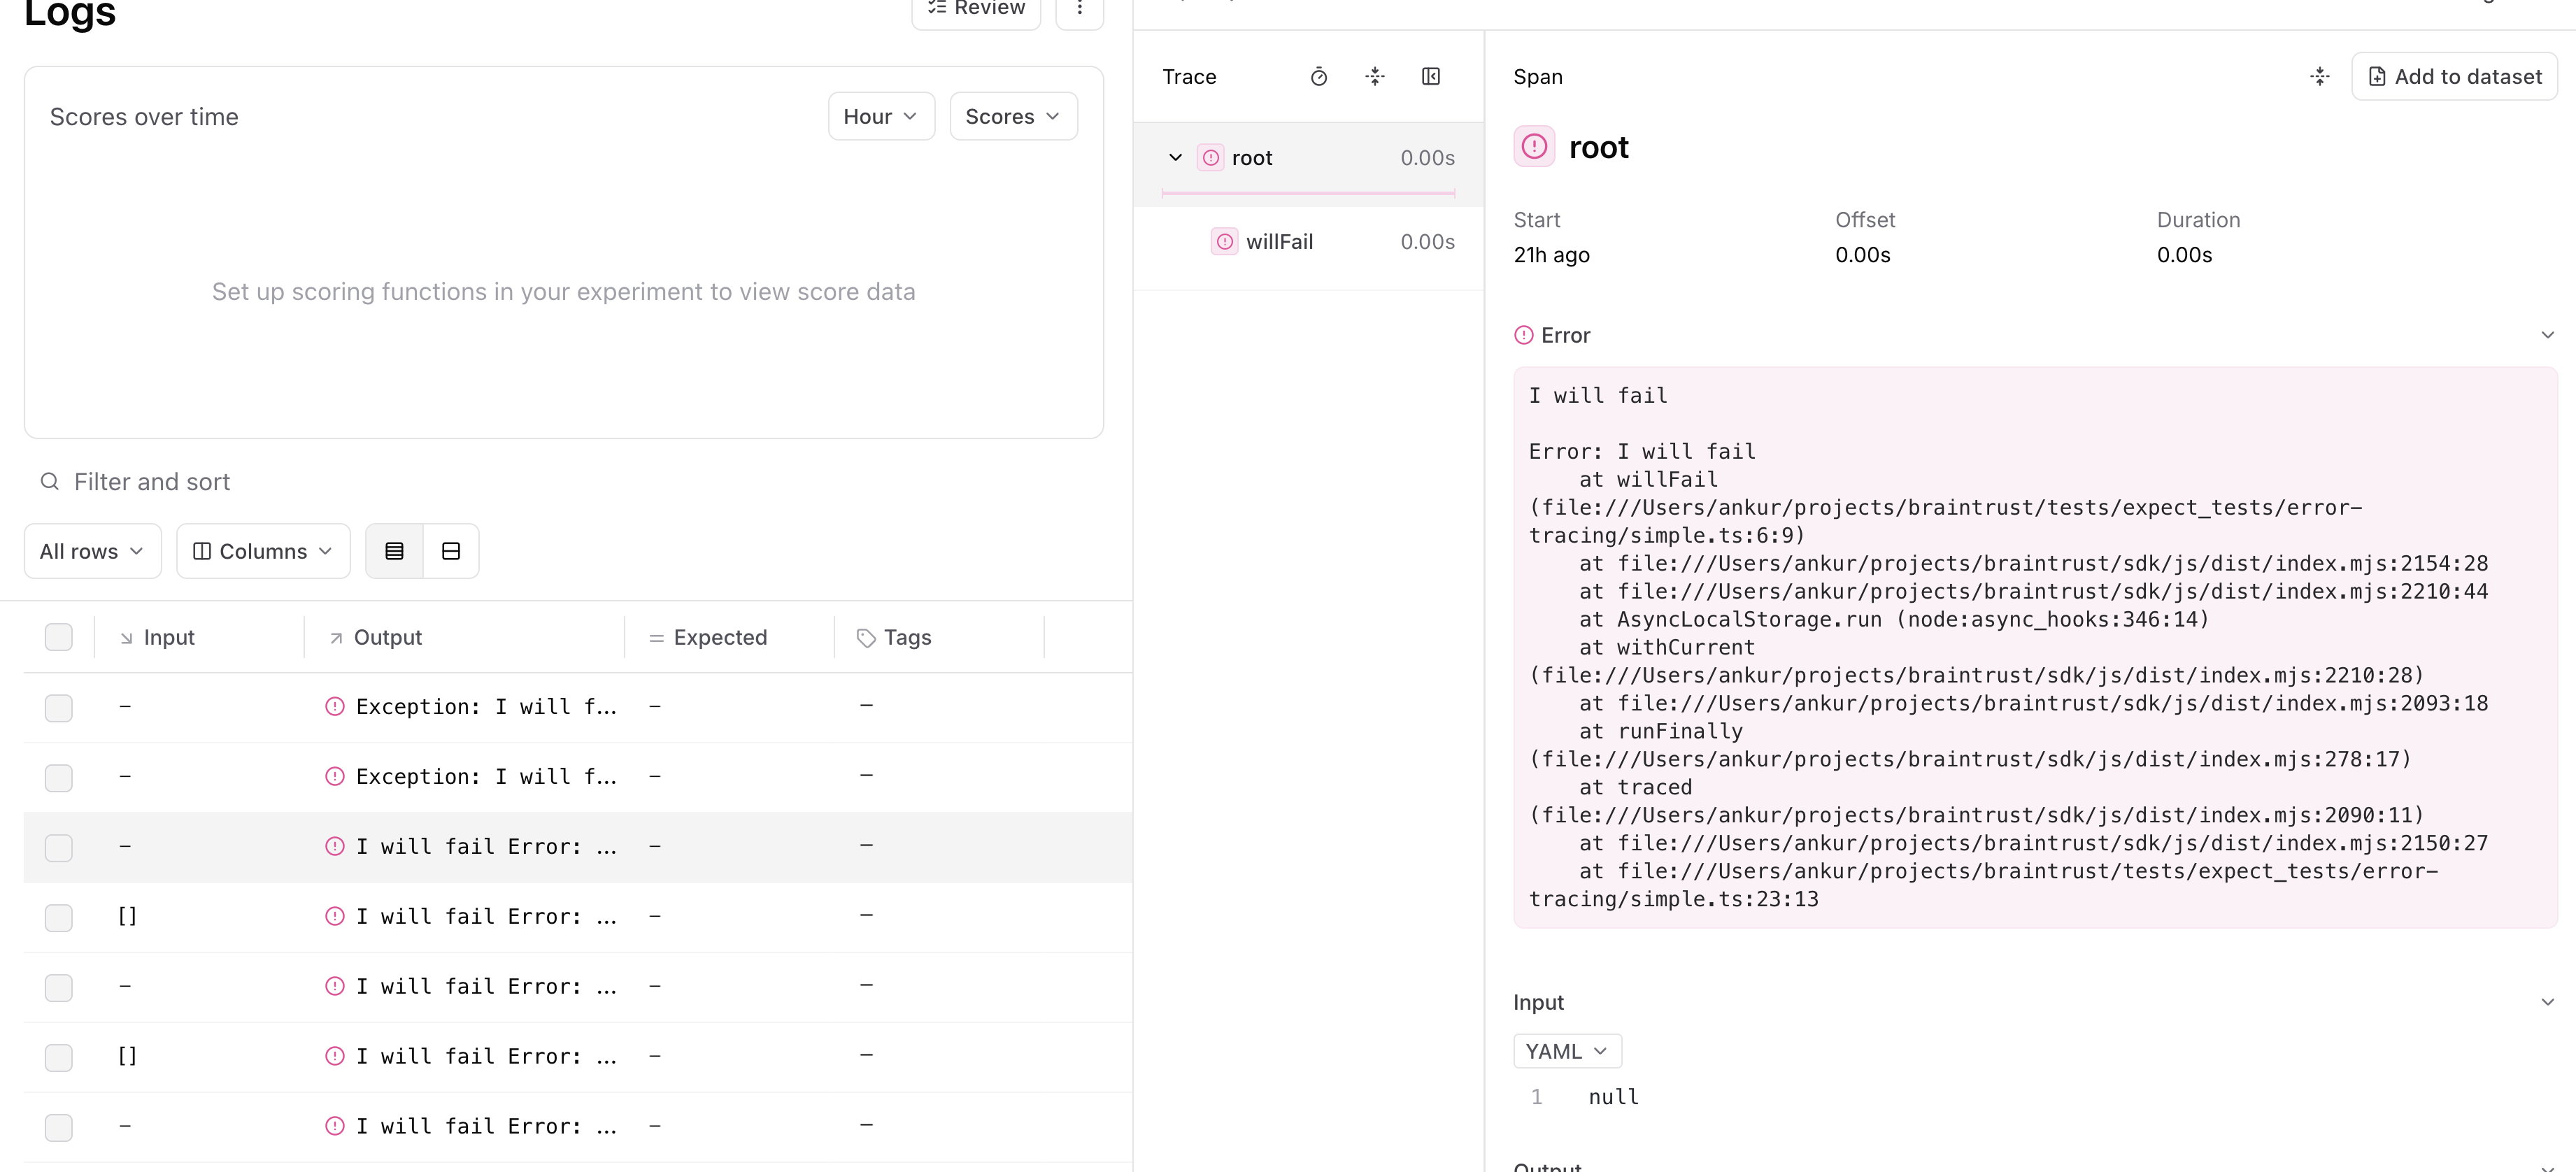
error field which you can also log to directly.
import { wrapTraced, currentSpan } from "braintrust";

async function processRequest(input: string) {
  return input.length > 10
    ? { error: "Input too long" }
    : { data: "Hello, world!" };
}

const requestHandler = wrapTraced(async function requestHandler(req: Request) {
  const body = await req.text();
  const result = await processRequest(body);
  if (result.error) {
    currentSpan().log({ error: result.error });
  } else {
    currentSpan().log({ input: req.body, output: result.data });
  }
  return result;
});

Trace deeply nested code

Often, you want to trace functions that are deep in the call stack, without having to propagate the span object throughout. Braintrust uses async-friendly context variables to make this workflow easy:
  • The traced function/decorator will create a span underneath the currently-active span.
  • The currentSpan() / current_span() method returns the currently active span, in case you need to do additional logging.
import {
  currentSpan,
  initLogger,
  traced,
  wrapOpenAI,
  wrapTraced,
} from "braintrust";
import OpenAI from "openai";

const logger = initLogger();
const client = wrapOpenAI(new OpenAI({ apiKey: process.env.OPENAI_API_KEY }));

export const runLLM = wrapTraced(async function runLLM(input) {
  const model = Math.random() > 0.5 ? "gpt-4o" : "gpt-4o-mini";
  const result = await client.chat.completions.create({
    model,
    messages: [{ role: "user", content: input }],
  });
  const output = result.choices[0].message.content;
  currentSpan().log({
    metadata: {
      randomModel: model,
    },
  });
  return output;
});

export const someLogic = wrapTraced(async function someLogic(input: string) {
  return await runLLM(
    "You are a magical wizard. Answer the following question: " + input,
  );
});

export async function POST(req: Request) {
  return await traced(async () => {
    const body = await req.json();
    const result = await someLogic(body.text);
    currentSpan().log({
      input: body.text,
      output: result,
      metadata: { user_id: body.userId },
    });
    return result;
  });
}

Mask sensitive data

Configure a global masking function to redact sensitive information before it’s sent to Braintrust. The masking applies to input, output, expected, metadata, and context fields.
import { setMaskingFunction, initLogger } from "braintrust";

// Mask API keys, passwords, and tokens
const maskFunction = (data: any): any => {
  if (typeof data === "string") {
    return data.replace(
      /\b(api[_-]?key|password|token)[\s:=]+\S+/gi,
      "$1: [REDACTED]",
    );
  }

  if (typeof data === "object" && data !== null) {
    if (Array.isArray(data)) {
      return data.map((item) => maskFunction(item));
    }

    const masked: any = {};
    for (const [key, value] of Object.entries(data)) {
      if (/^(api[_-]?key|password|secret|token|auth|credential)$/i.test(key)) {
        masked[key] = "[REDACTED]";
      } else {
        masked[key] = maskFunction(value);
      }
    }
    return masked;
  }

  return data;
};

setMaskingFunction(maskFunction);

const logger = initLogger({ projectName: "My Project" });

logger.log({
  input: { query: "Process payment", api_key: "sk-1234567890" },
  metadata: { password: "super-secret" },
});
// Logs: { query: "Process payment", api_key: "[REDACTED]" }

Mask personally identifiable information (PII)

This example demonstrates masking PII such as email addresses, phone numbers, and social security numbers:
import { setMaskingFunction } from "braintrust";

const maskPII = (data: any): any => {
  if (typeof data === "string") {
    let masked = data;
    // Mask email addresses
    masked = masked.replace(
      /\b[A-Za-z0-9._%+-]+@[A-Za-z0-9.-]+\.[A-Z|a-z]{2,}\b/g,
      "[EMAIL]",
    );
    // Mask phone numbers (US format)
    masked = masked.replace(/\b\d{3}[-.]?\d{3}[-.]?\d{4}\b/g, "[PHONE]");
    // Mask SSN
    masked = masked.replace(/\b\d{3}-\d{2}-\d{4}\b/g, "[SSN]");
    return masked;
  }

  if (typeof data === "object" && data !== null) {
    if (Array.isArray(data)) {
      return data.map((item) => maskPII(item));
    }

    const masked: any = {};
    for (const [key, value] of Object.entries(data)) {
      if (
        ["email", "phone", "ssn", "phone_number"].includes(key.toLowerCase())
      ) {
        masked[key] = `[${key.toUpperCase()}]`;
      } else {
        masked[key] = maskPII(value);
      }
    }
    return masked;
  }

  return data;
};

setMaskingFunction(maskPII);

// Usage example
import { initLogger } from "braintrust";
const logger = initLogger({ projectName: "My Project" });

logger.log({
  input: {
    message: "Contact [email protected] or call 555-123-4567",
    user: {
      name: "John Doe",
      email: "[email protected]",
      phone: "555-123-4567",
      ssn: "123-45-6789",
    },
  },
});

// This will log:
// input: {
//   message: "Contact [EMAIL] or call [PHONE]",
//   user: {
//     name: "John Doe",
//     email: "[EMAIL]",
//     phone: "[PHONE]",
//     ssn: "[SSN]"
//   }
// }

Enable custom masking for specific data structures

This example shows how to handle custom data structures and implement selective masking based on context:
import { setMaskingFunction } from "braintrust";

const customMask = (data: any): any => {
  // Handle different data types
  if (typeof data === "string") {
    // Only mask if the string contains certain keywords
    if (data.toLowerCase().includes("confidential")) {
      return "[CONFIDENTIAL DATA REMOVED]";
    }
    return data;
  }

  if (typeof data === "number") {
    // Example: mask large monetary values
    if (data > 10000) {
      return -1; // Sentinel value for masked numbers
    }
    return data;
  }

  if (typeof data === "object" && data !== null) {
    // Handle special data structures
    if ("credit_card" in data && "cvv" in data) {
      // Mask credit card info but keep last 4 digits
      return {
        ...data,
        credit_card: (data as any).credit_card?.replace(/\d(?=\d{4})/g, "X"),
        cvv: "XXX",
        amount: (data as any).amount, // Keep amount unmasked
      };
    }

    if (Array.isArray(data)) {
      return data.map((item) => customMask(item));
    }

    // Default object handling
    const masked: any = {};
    for (const [key, value] of Object.entries(data)) {
      // Skip masking for specific fields
      if (["timestamp", "request_id", "trace_id"].includes(key)) {
        masked[key] = value;
      } else {
        masked[key] = customMask(value);
      }
    }
    return masked;
  }

  return data;
};

setMaskingFunction(customMask);

// Usage example
import { initLogger } from "braintrust";
const logger = initLogger({ projectName: "My Project" });

logger.log({
  input: {
    transaction: {
      credit_card: "4532-1234-5678-9012",
      cvv: "123",
      amount: 15000,
      timestamp: "2024-01-01T00:00:00Z",
    },
    internal_note: "Confidential: Premium customer",
  },
  metadata: {
    trace_id: "trace-123",
    debug_info: "Processing large transaction",
  },
});

// This will log:
// input: {
//   transaction: {
//     credit_card: "XXXX-XXXX-XXXX-9012",
//     cvv: "XXX",
//     amount: -1,
//     timestamp: "2024-01-01T00:00:00Z"
//   },
//   internal_note: "[CONFIDENTIAL DATA REMOVED]"
// },
// metadata: {
//   trace_id: "trace-123",
//   debug_info: "Processing large transaction"
// }

Considerations

  • The masking function is applied globally and affects all logging across your application
  • Masking is applied after events are merged but before they are sent to Braintrust
  • The masking function can modify data in place, which is often more performant
  • Only the fields input, output, expected, metadata, and context are passed to the masking function
  • Always test your masking function thoroughly to ensure sensitive data is properly redacted
  • In the event of an error, the data will be masked with a generic message like ERROR: Failed to mask field to avoid leaking sensitive information

Update spans

Similar to distributed tracing, it can be useful to update spans after you initially log them. For example, if you collect the output of a span asynchronously. The Experiment and Logger classes each have an updateSpan() method, which you can call with the span’s id to perform an update.
import { initLogger, wrapTraced, currentSpan } from "braintrust";

const logger = initLogger({
  projectName: "my-project", // Replace with your project name
  apiKey: process.env.BRAINTRUST_API_KEY, // Replace with your API key
});

const startRequest = wrapTraced(async function startRequest(request) {
  const handle = startSomething(request.body);
  return {
    result: handle,
    spanId: currentSpan().id,
  };
});

const finishRequest = wrapTraced(async function finishRequest(handle, spanId) {
  const result = await finishSomething(handle);
  logger.updateSpan({
    id: spanId,
    output: result,
  });
  return result;
});
You can also use span.export() to export the span in a fully contained string, which is useful if you have multiple loggers or perform the update from a different service.
import { initLogger, wrapTraced, currentSpan, updateSpan } from "braintrust";

const logger = initLogger({
  projectName: "my-project", // Replace with your project name
  apiKey: process.env.BRAINTRUST_API_KEY, // Replace with your API key
});

const startRequest = wrapTraced(async function startRequest(request) {
  const handle = startSomething(request.body);
  return {
    result: handle,
    exported: currentSpan().export(),
  };
});

const finishRequest = wrapTraced(
  async function finishRequest(handle, exported) {
    const result = await finishSomething(handle);
    updateSpan({
      exported,
      output: result,
    });
    return result;
  },
);
It’s important to make sure the update happens after the original span has been logged, otherwise they can trample on each other.Distributed tracing is designed specifically to prevent this edge case, and instead works by logging a new (sub) span.
The Span.permalink method formats a permalink to the Braintrust application for viewing the span. The link will open the UI to the row represented by the Span object. If you do not have access to the original Span object, the slug produced by Span.export contains enough information to produce the same permalink. The braintrust.permalink function can be used to construct a deep link to the row in the UI from a given span slug.

Manually manage spans

In more complicated environments, it may not always be possible to wrap the entire duration of a span within a single block of code. In such cases, you can always pass spans around manually. Consider this hypothetical server handler, which logs to a span incrementally over several distinct callbacks:
import {
  Span,
  initLogger,
  startSpan,
  wrapOpenAI,
  wrapTraced,
} from "braintrust";
import { OpenAI } from "openai";

const client = wrapOpenAI(new OpenAI({ apiKey: process.env.OPENAI_API_KEY }));
const logger = initLogger({ projectName: "My long-running project" });

const computeOutput = wrapTraced(async function computeOutput(
  systemPrompt: string,
  userInput: string,
  parentSpan: Span,
) {
  return await client.chat.completions.create({
    model: "gpt-3.5-turbo",
    messages: [
      { role: "system", content: systemPrompt },
      { role: "user", content: userInput },
    ],
  });
});

class MyHandler {
  private liveSpans: Record<string, { span: Span; input: string }>;

  constructor() {
    this.liveSpans = {};
  }

  async onRequestStart(requestId: string, input: string, expected: string) {
    const span = startSpan({ name: requestId, event: { input, expected } });
    this.liveSpans[requestId] = { span, input };
  }

  async onGetOutput(requestId: string, systemPrompt: string) {
    const { span, input } = this.liveSpans[requestId];
    const output = await computeOutput(systemPrompt, input, span);
    span.log({ output });
  }

  async onRequestEnd(requestId: string, metadata: Record<string, string>) {
    const { span } = this.liveSpans[requestId];
    delete this.liveSpans[requestId];
    span.log({ metadata });
    span.end();
  }
}

Import and export spans

Spans are processed in Braintrust as a simple format, consisting of input, output, expected, metadata, scores, and metrics fields (all optional), as well as a few system-defined fields which you usually do not need to mess with, but are described below for completeness. This simple format makes it easy to import spans captured in other systems (e.g. languages other than TypeScript/Python), or to export spans from Braintrust to consume in other systems.

Underlying format

The underlying span format contains a number of fields which are not exposed directly through the SDK, but are useful to understand when importing and exporting spans.
  • id is a unique identifier for the span, within the container (e.g. an experiment, or logs for a project). You can technically set this field yourself (to overwrite a span), but it is recommended to let Braintrust generate it automatically.
  • input, output, expected, scores, metadata, and metrics are optional fields which describe the span and are exposed in the Braintrust UI. When you use the TypeScript or Python SDK, these fields are validated for you (e.g. scores must be a mapping from strings to numbers between 0 and 1).
  • span_attributes contains attributes about the span. Currently the recognized attributes are name, which is used to display the span name in the UI, and type, which displays a helpful icon. type should be one of "llm", "score", "function", "eval", "task", or "tool".
  • Depending on the container, e.g. an experiment, or project logs, or a dataset, fields like project_id, experiment_id, dataset_id, and log_id are set automatically, by the SDK, so the span can be later retrieved by the UI and API. You should not set these fields yourself.
  • span_id, root_span_id, and span_parents are used to construct the span tree and are automatically set by Braintrust. You should not set these fields yourself, but rather let the SDK create and manage them (even if importing from another system).
When importing spans, the only fields you should need to think about are input, output, expected, scores, metadata, and metrics. You can use the SDK to populate the remaining fields, which the next section covers with an example. Here is an example of a span in the underlying format:
{
  "id": "385052b6-50a2-43b4-b52d-9afaa34f0bff",
  "input": {
    "question": "What is the origin of the customer support issue??"
  },
  "output": {
    "answer": "The customer support issue originated from a bug in the code.",
    "sources": ["http://www.example.com/faq/1234"]
  },
  "expected": {
    "answer": "Bug in the code that involved dividing by zero.",
    "sources": ["http://www.example.com/faq/1234"]
  },
  "scores": {
    "Factuality": 0.6
  },
  "metadata": {
    "pos": 1
  },
  "metrics": {
    "end": 1704872988.726753,
    "start": 1704872988.725727
    // Can also include `tokens`, etc. here
  },
  "project_id": "d709efc0-ac9f-410d-8387-345e1e5074dc",
  "experiment_id": "51047341-2cea-4a8a-a0ad-3000f4a94a96",
  "created": "2024-01-10T07:49:48.725731+00:00",
  "span_id": "70b04fd2-0177-47a9-a70b-e32ca43db131",
  "root_span_id": "68b4ef73-f898-4756-b806-3bdd2d1cf3a1",
  "span_parents": ["68b4ef73-f898-4756-b806-3bdd2d1cf3a1"],
  "span_attributes": {
    "name": "doc_included"
  }
}

Example import/export

The following example walks through how to generate spans in one program and then import them to Braintrust in a script. You can use this pattern to support tracing or running experiments in environments that use programming languages other than TypeScript/Python (e.g. Kotlin, Java, Go, Ruby, Rust, C++), or codebases that cannot integrate the Braintrust SDK directly.

Generate spans

The following example runs a simple LLM app and collects logging information at each stage of the process, without using the Braintrust SDK. This could be implemented in any programming language, and you certainly do not need to collect or process information this way. All that matters is that your program generates a useful format that you can later parse and use to import the spans using the SDK.
import json
import time

import openai

client = openai.OpenAI()

def run_llm(input, **params):
    start = time.time()
    messages = [{"role": "user", "content": input}]
    result = client.chat.completions.create(
        model="gpt-3.5-turbo", messages=[{"role": "user", "content": input}], **params
    )
    end = time.time()
    return {
        "input": messages,
        "output": result.choices[0].message.dict(),
        "metadata": {"model": "gpt-3.5-turbo", "params": params},
        "metrics": {
            "start": start,
            "end": end,
            "tokens": result.usage.total_tokens,
            "prompt_tokens": result.usage.prompt_tokens,
            "completion_tokens": result.usage.completion_tokens,
        },
        "name": "OpenAI Chat Completion",
    }

PROMPT_TEMPLATE = "Answer the following question: %s"

def run_input(question, expected):
    result = run_llm(PROMPT_TEMPLATE % question, max_tokens=32)
    return {
        "input": question,
        "output": result["output"]["content"],
        # Expected is propagated here to make it easy to use it in the import
        # script, but it's not strictly needed to be here.
        "expected": expected,
        "metadata": {
            "template": PROMPT_TEMPLATE,
        },
        "children": [result],
        "name": "run_input",
    }

if __name__ == "__main__":
    for question, expected in [
        [
            "What is 1+1?",
            "2.",
        ],
        [
            "Which is larger, the sun or the moon?",
            "The sun.",
        ],
    ]:
        print(json.dumps(run_input(question, expected)))
Running this script produces output like:
{"input": "What is 1+1?", "output": "The sum of 1+1 is 2.", "expected": "2.", "metadata": {"template": "Answer the following question: %s"}, "children": [{"input": [{"role": "user", "content": "Answer the following question: What is 1+1?"}], "output": {"content": "The sum of 1+1 is 2.", "role": "assistant", "function_call": null, "tool_calls": null}, "metadata": {"model": "gpt-3.5-turbo", "params": {"max_tokens": 32}}, "metrics": {"start": 1704916642.978631, "end": 1704916643.450115, "tokens": 30, "prompt_tokens": 19, "completion_tokens": 11}, "name": "OpenAI Chat Completion"}], "name": "run_input"}
{"input": "Which is larger, the sun or the moon?", "output": "The sun is larger than the moon.", "expected": "The sun.", "metadata": {"template": "Answer the following question: %s"}, "children": [{"input": [{"role": "user", "content": "Answer the following question: Which is larger, the sun or the moon?"}], "output": {"content": "The sun is larger than the moon.", "role": "assistant", "function_call": null, "tool_calls": null}, "metadata": {"model": "gpt-3.5-turbo", "params": {"max_tokens": 32}}, "metrics": {"start": 1704916643.450675, "end": 1704916643.839096, "tokens": 30, "prompt_tokens": 22, "completion_tokens": 8}, "name": "OpenAI Chat Completion"}], "name": "run_input"}

Import spans

The following program uses the Braintrust SDK in Python to import the spans generated by the previous script. Again, you can modify this program to fit the needs of your environment, e.g. to import spans from a different source or format.
import json
import sys

import braintrust
from autoevals import Factuality

def upload_tree(span, node, **kwargs):
    span.log(
        input=node.get("input"),
        output=node.get("output"),
        expected=node.get("expected"),
        metadata=node.get("metadata"),
        metrics=node.get("metrics"),
        **kwargs,
    )
    for c in node.get("children", []):
        with span.start_span(name=c.get("name")) as span:
            upload_tree(span, c)

if __name__ == "__main__":
    # This could be another container, like a log stream initialized
    # via braintrust.init_logger()
    experiment = braintrust.init("My Support App")

    factuality = Factuality()
    for line in sys.stdin:
        tree = json.loads(line)
        with experiment.start_span(name="task") as span:
            upload_tree(span, tree)
            with span.start_span(name="Factuality"):
                score = factuality(input=tree["input"], output=tree["output"], expected=tree["expected"])
            span.log(
                scores={
                    "factuality": score.score,
                },
                # This will merge the metadata from the factuality score with the
                # metadata from the tree.
                metadata={"factuality": score.metadata},
            )

    print(experiment.summarize())

Run traced functions in a ThreadPoolExecutor

The Python SDK uses context variables to hold the span state for traces. This means that if you run a traced function inside of a concurrent.futures.ThreadPoolExecutor, the span state will be lost. Instead, you can use the TracedThreadPoolExecutor class provided by the Braintrust SDK. This class is a thin extension of concurrent.futures.ThreadPoolExecutor that captures and passes context variables to its workers.
import os
import sys

import braintrust
import openai

braintrust.init_logger("math")

@braintrust.traced
def addition(client: openai.OpenAI):
    return client.chat.completions.create(
        model="gpt-4o-mini",
        messages=[{"role": "user", "content": "What is 1+1?"}],
    )

@braintrust.traced
def multiplication(client: openai.OpenAI):
    return client.chat.completions.create(
        model="gpt-4o-mini",
        messages=[{"role": "user", "content": "What is 1*1?"}],
    )

@braintrust.traced
def main():
    client = braintrust.wrap_openai(openai.OpenAI(api_key=os.environ["OPENAI_API_KEY"]))
    with braintrust.TracedThreadPoolExecutor(max_workers=2) as e:
        try:
            a = e.submit(addition, client=client)
            m = e.submit(multiplication, client=client)
            a.result()
            m.result()
        except Exception as e:
            print("Failed", e, file=sys.stderr)

if __name__ == "__main__":
    main()

Disable logging

If you are not running an eval or logging, then the tracing code will be a no-op with negligible performance overhead. In other words, if you do not call initLogger/init_logger/init, in your code, then the tracing annotations are a no-op.

Trace data structures

A trace is a directed acyclic graph (DAG) of spans. Each span can have multiple parents, but most executions are a tree of spans. Currently, the UI only supports displaying a single root span, due to the popularity of this pattern.

Background logging and retries

If the Braintrust SDK cannot log for some reason (e.g. a network issue), then your application should not be affected. All logging operations run in a background thread, including api key validation, project/experiment registration, and flushing logs. When errors occur, the SDK retries a few times before eventually giving up. You’ll see loud warning messages when this occurs. And you can tune this behavior via the environment variables defined in Tune performance.

Log to multiple projects

When logging to multiple projects, create separate loggers with setCurrent: false to avoid conflicts.
import { initLogger } from "braintrust";

const projectALogger = initLogger({
  projectName: "Project A",
  setCurrent: false,
});

const projectBLogger = initLogger({
  projectName: "Project B",
  setCurrent: false,
});

// Use specific loggers
await projectALogger.traced(async (span) => {
  span.log({ output: "Logged to Project A" });
});

await projectBLogger.traced(async (span) => {
  span.log({ output: "Logged to Project B" });
});
Cache loggers for better performance. Initializing a logger on every request adds overhead. Create loggers once and reuse them.

Customize span rendering

Although the built-in span viewers cover a variety of different span field display types— YAML, JSON, Markdown, LLM calls, and more—you may want to further customize the display of your span data. For example, you could include the id of an internal database and want to fetch and display its contents in the span viewer. Or, you may want to reformat the data in the span in a way that’s more useful for your use case than the built-in options. Span iframes provide complete control over how you visualize span data, making them particularly valuable for when you have custom visualization needs or want to incorporate data from external sources. They also support interactive features - for example, you can implement custom human review feedback mechanisms like thumbs up/down buttons on image search results and write the scores directly to the expected or metadata fields. 
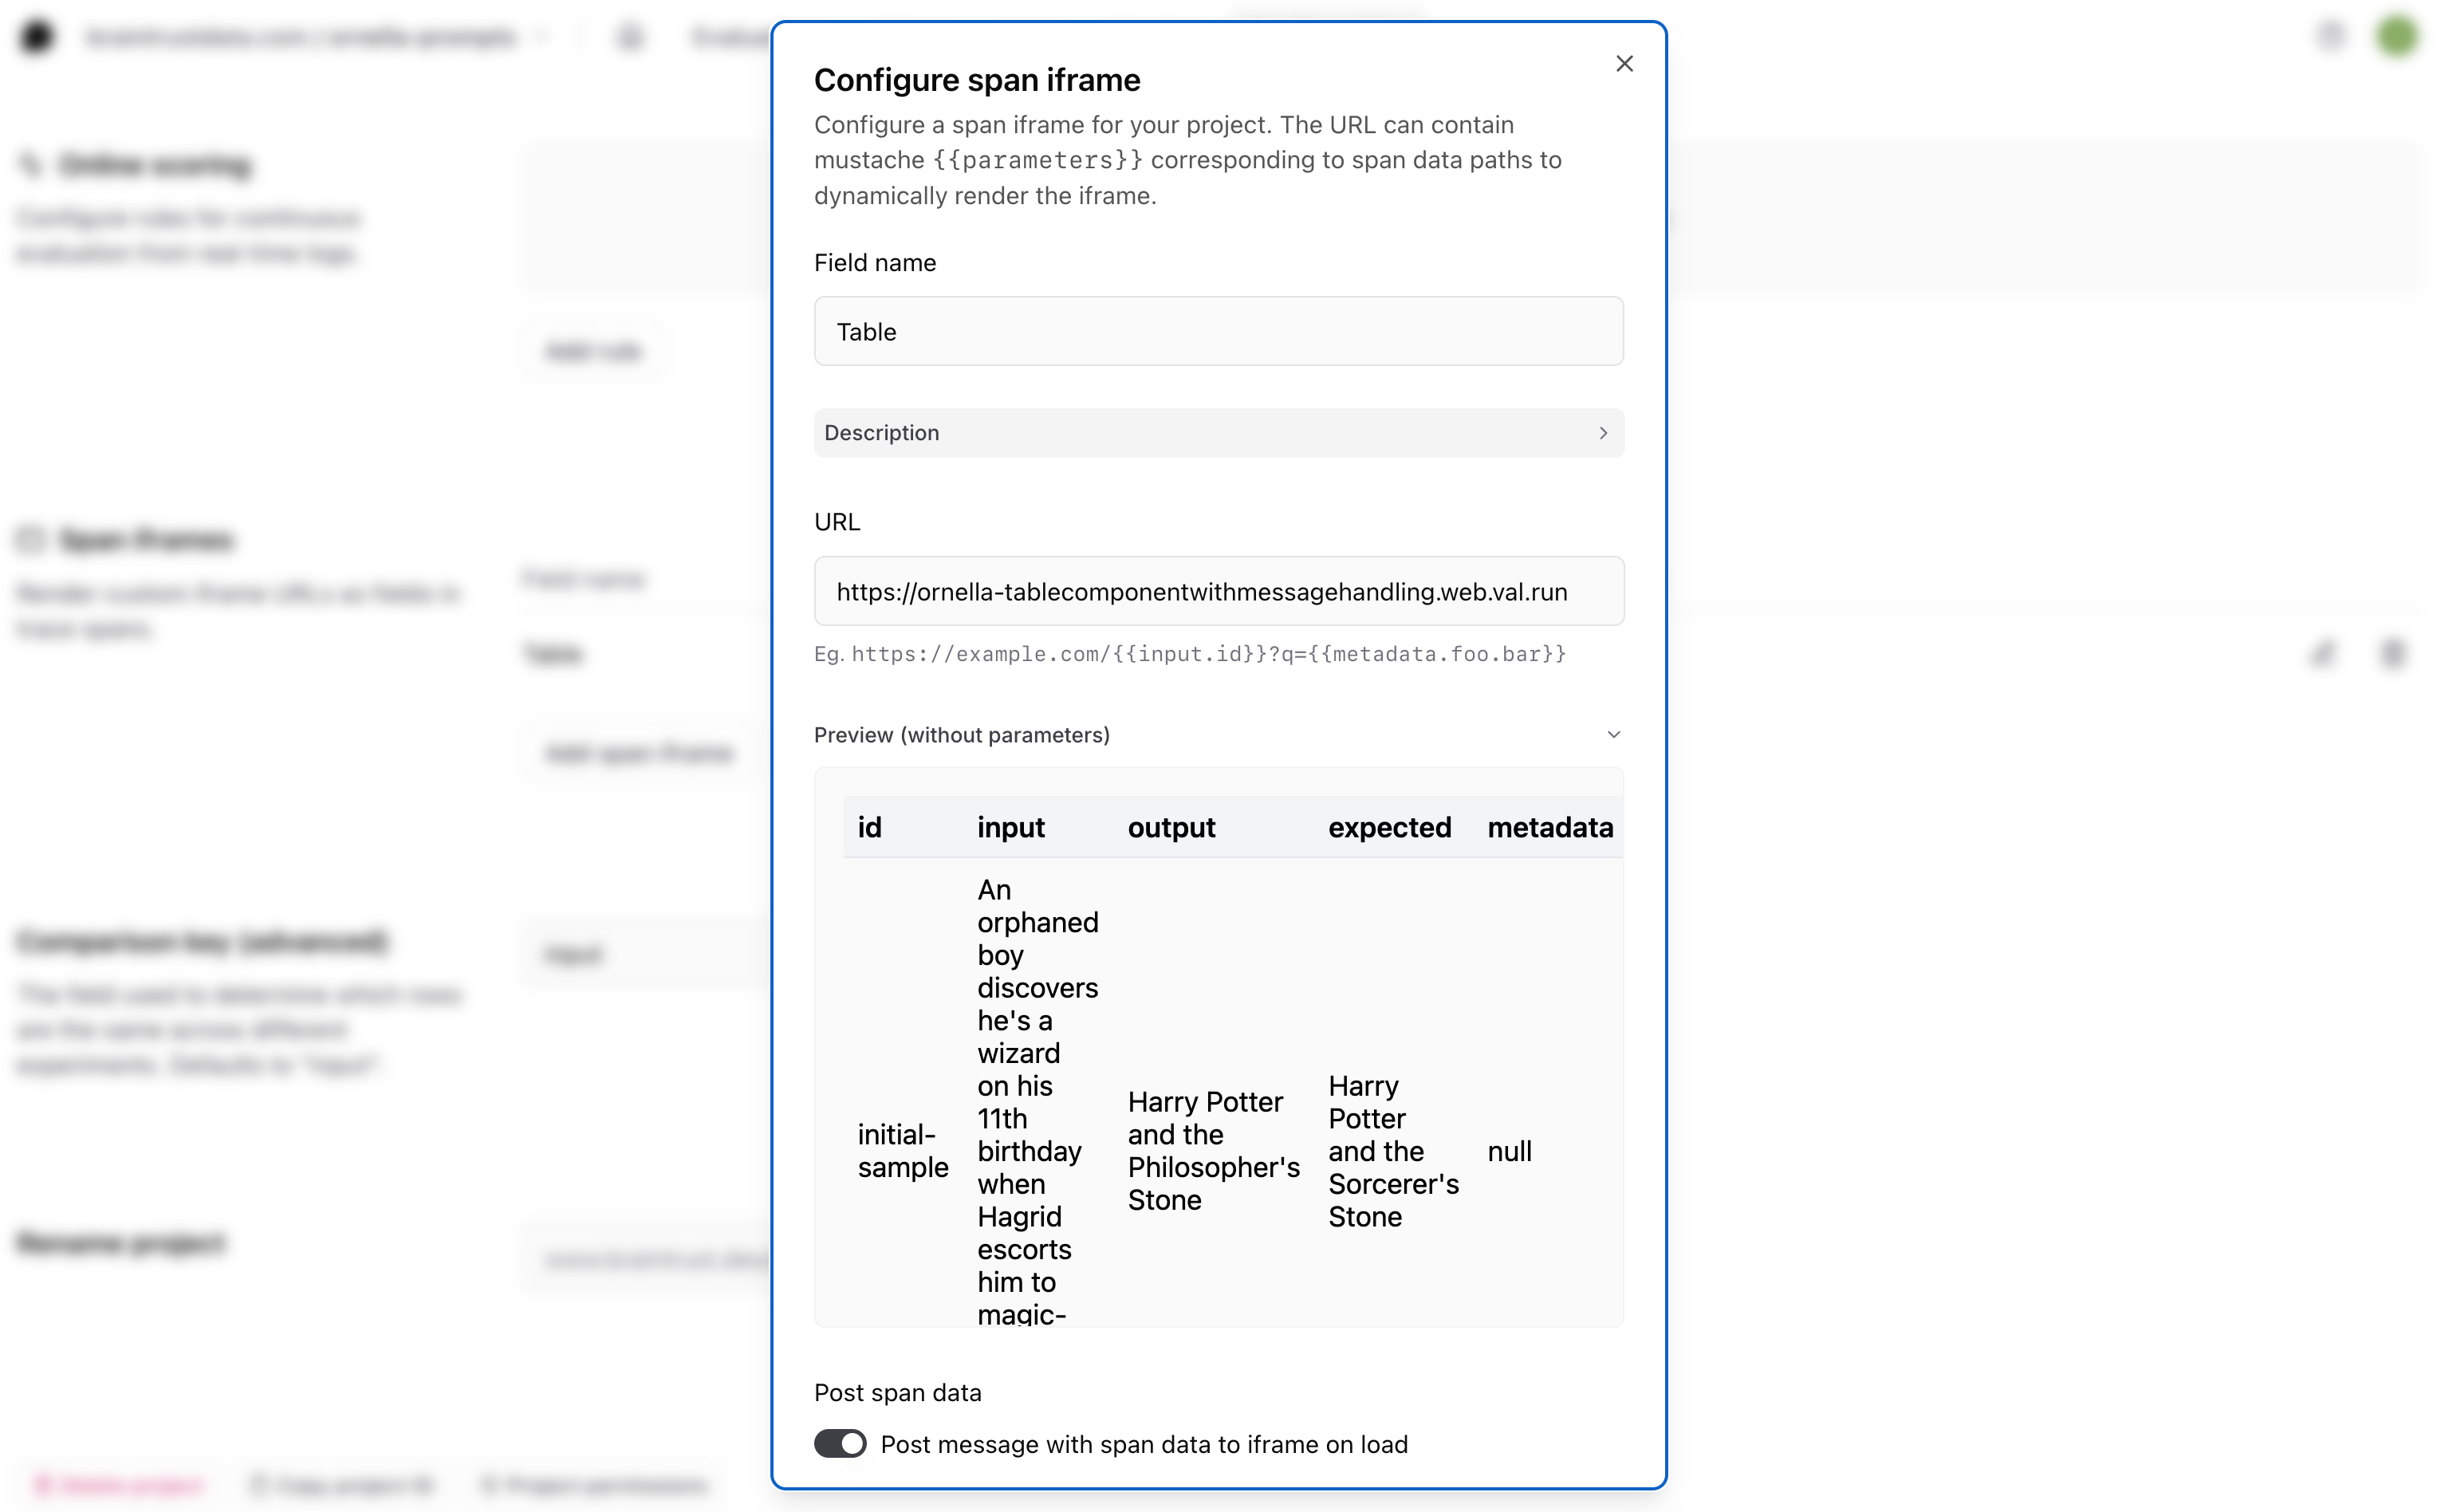
To enable a span iframe, visit the Configuration tab of a project, and create one. You can define the URL, and then customize its behavior:
  • Provide a title, which is displayed at the top of the section.
  • Provide, via mustache, template parameters to the URL. These parameters are in terms of the top-level span fields, e.g. {{input}}, {{output}}, {{expected}}, etc. or their subfields, e.g. {{input.question}}.
  • Allow Braintrust to send a message to the iframe with the span data, which is useful when the data may be very large and not fit in a URL.
  • Send messages from the iframe back to Braintrust to update the span data.

Quickstart

Since span iframes run your custom code, you need to host them somewhere. Tools like val.town or v0.dev make it easy to do this. You can use https://v0-render-iframe-data.vercel.app/ as a quick test. It renders a JSON object which shows you all of the fields that are available in the span. Span iframe

iframe message format

In Zod format, the message schema looks like this:
import { z } from "zod";

export const settingsMessageSchema = z.object({
  type: z.literal("settings"),
  settings: z.object({
    theme: z.enum(["light", "dark"]),
    readOnly: z.boolean(),
  }),
});

export const iframeUpdateMessageSchema = z.object({
  type: z.literal("update"),
  field: z.string(),
  data: z.any(),
});

export const dataMessageSchema = z.object({
  type: z.literal("data"),
  data: z.object({
    input: z.array(z.record(z.unknown())),
  }),
});

export const messageSchema = z.union([
  settingsMessageSchema,
  dataMessageSchema,
]);
There are cases when the span data will be sent before the page is fully loaded. You can manually request span data by sending a message with { "type": "request-data" } from your frame code.
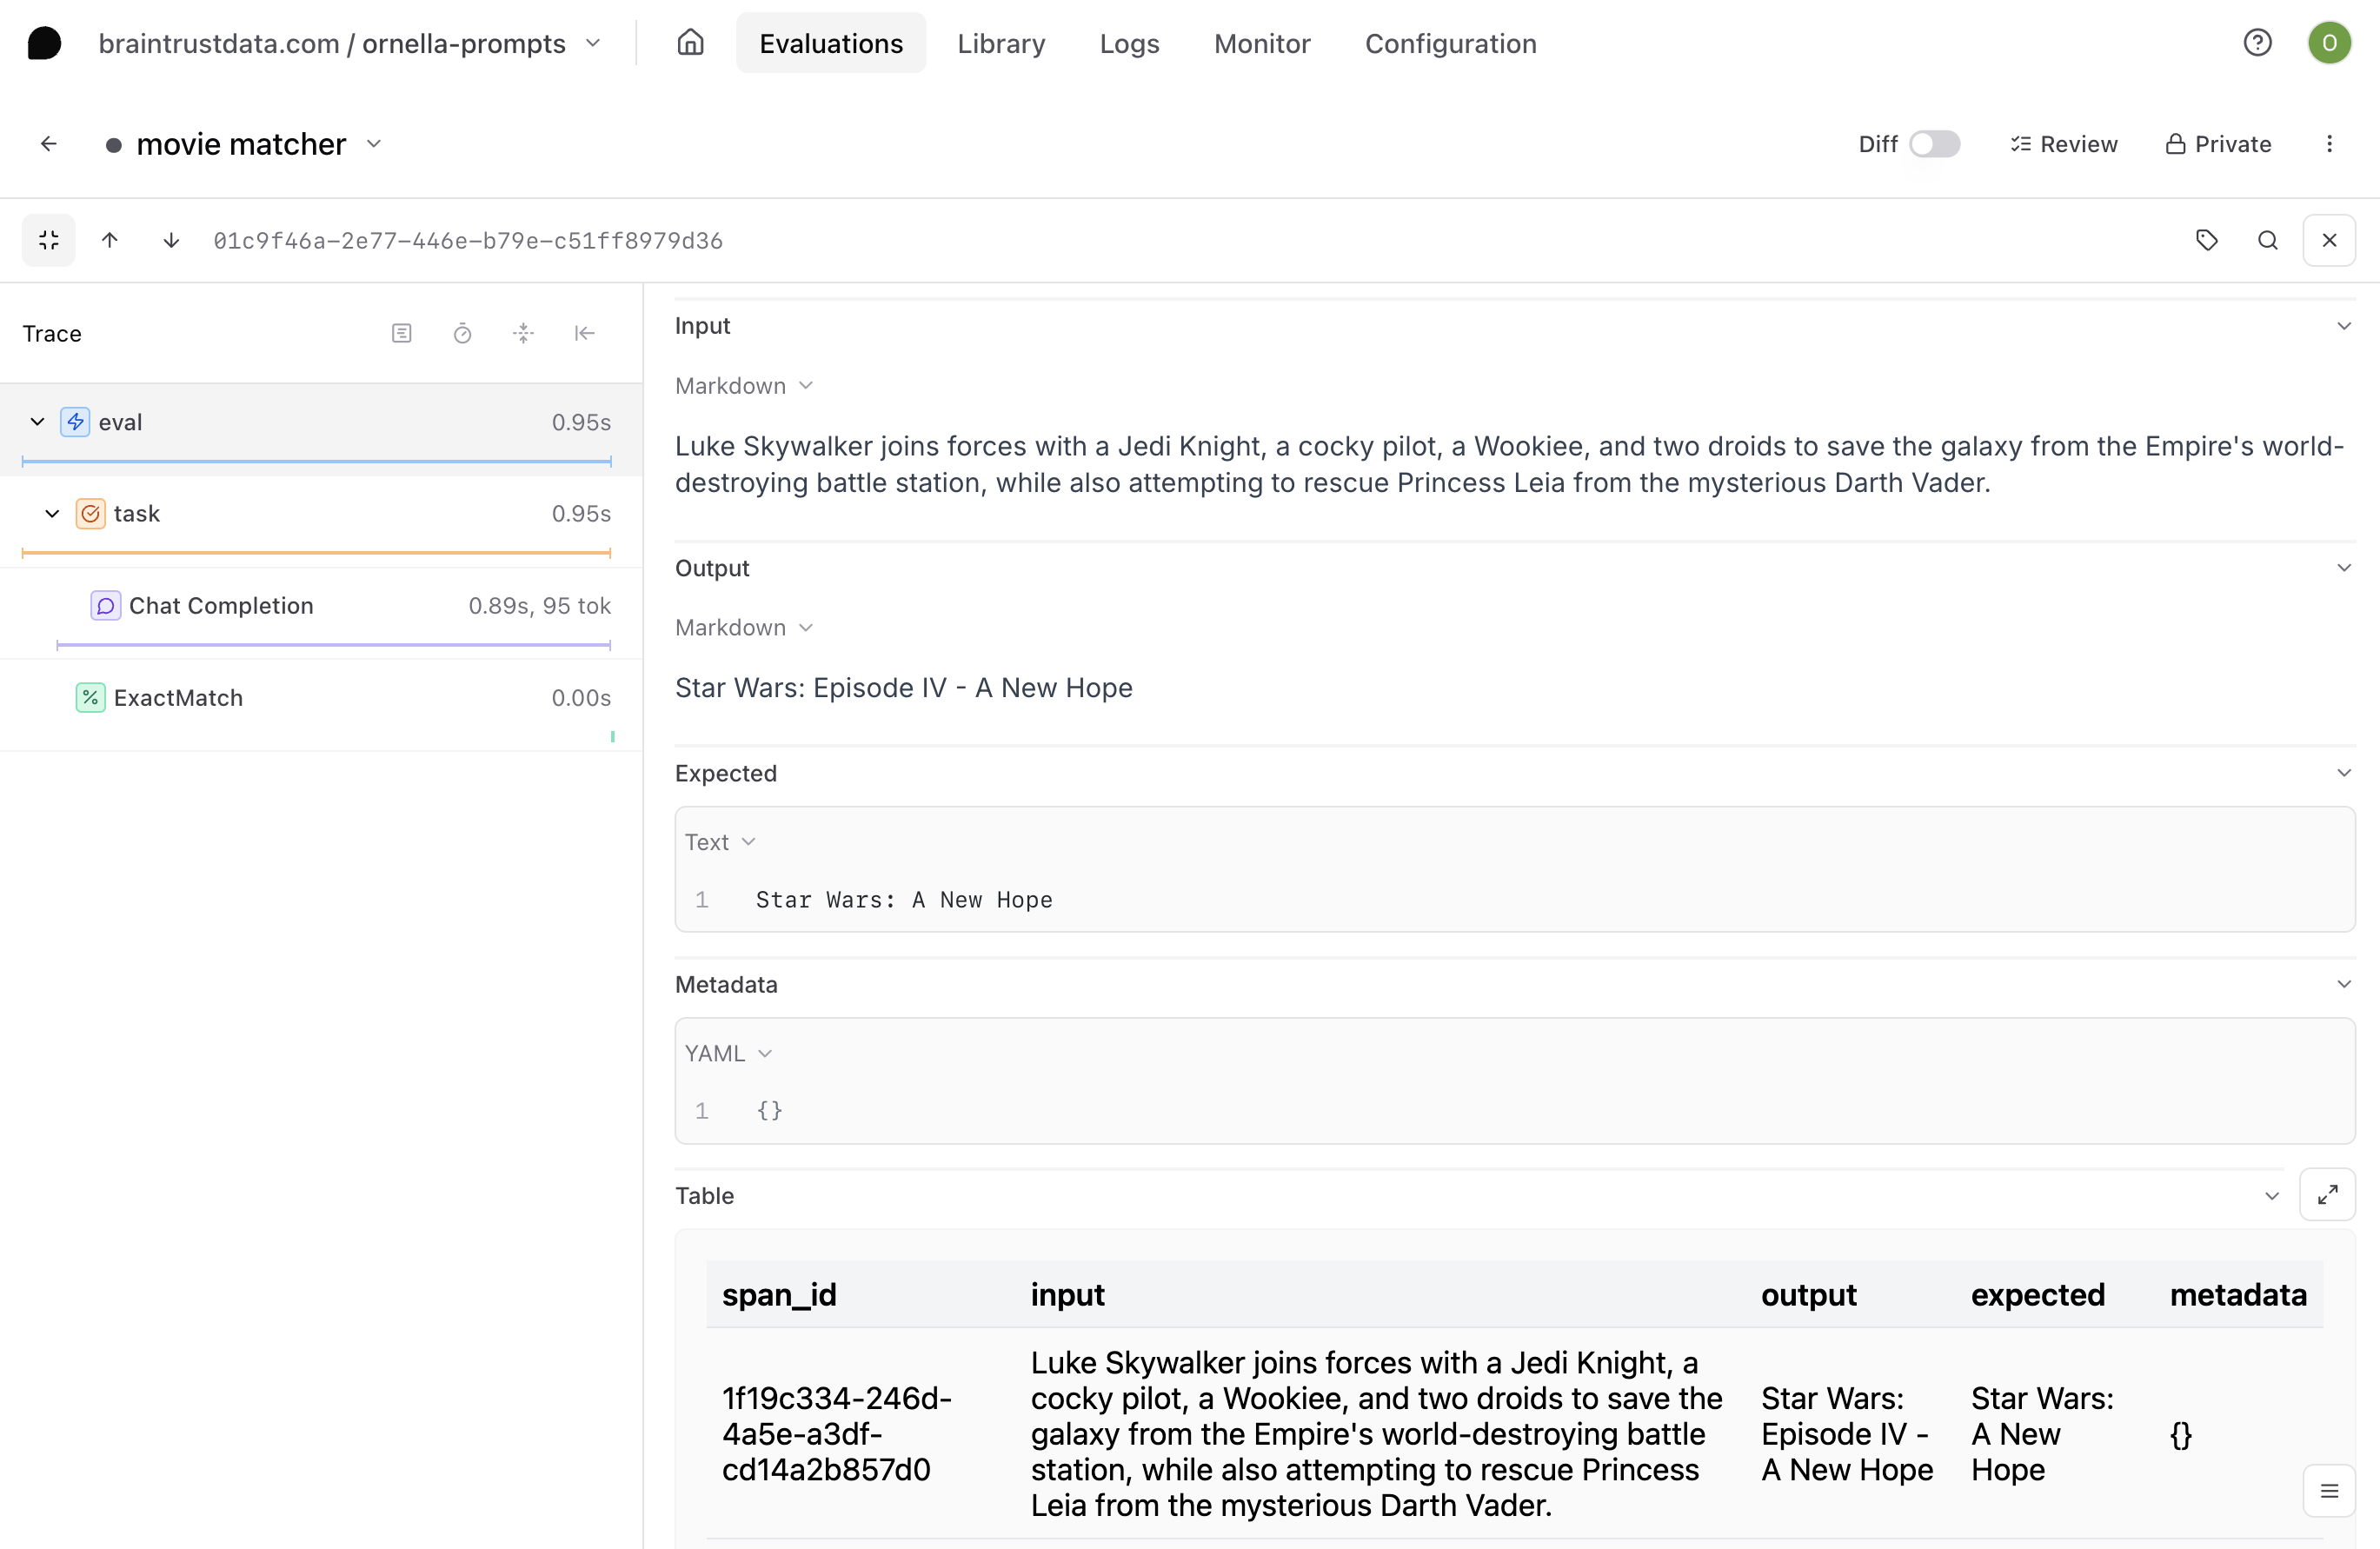
Sample workflow

Say you want to render the input, output, expected, and id fields for a given span in a table format for easier parsing.
1
The first thing you’ll need to do is choose where to host your table. Span iframes are externally hosted, either in your own infrastructure or a cloud hosting service. In this example, we’ll use Val Town. Navigate to val.town and create an account if you don’t already have one.
2
Next, you’ll need to write the code for the component you’d like to render inside of your span, making sure that it uses the correct message handling to allow communication with Braintrust. To speed things up, we can go to Townie, Val Town’s AI assistant that helps you get pages up and running quickly. Prompt the AI to generate your table code for you, keeping these few things in mind:
  • You’ll want to add the message handling that allows the iframe to send messages back to Braintrust
To do this, we use the window.postMessage() method behind the scenes.
  • You’ll want to use some hardcoded span data to illustrate what it might look like in the preview before you ship
For example, your prompt might look something like this:
Create a table component in React that uses this type of message handling:

"use client";

import {
  Table,
  TableBody,
  TableCell,
  TableHead,
  TableHeader,
  TableRow,
} from "@/components/ui/table";
import { useEffect, useMemo, useState } from "react";
import { z } from "zod";

export const dataMessageSchema = z.object({
  type: z.literal("data"),
  data: z.object({
    input: z.array(z.record(z.string())),
  }),
});

export const settingsMessageSchema = z.object({
  type: z.literal("settings"),
  settings: z.object({
    theme: z.enum(["light", "dark"]),
    readOnly: z.boolean(),
  }),
});

export const messageSchema = z.union([
  dataMessageSchema,
  settingsMessageSchema,
]);

export type Message = z.infer<typeof messageSchema>;

export default function TablePage() {
  const [data, setData] = useState<Record<string, unknown>[]>([]);

  useEffect(() => {
    const handleMessage = (event: MessageEvent) => {
      try {
        const message = messageSchema.parse(event.data);
        if (message.type === "data") {
          setData(message.data.input);
        }
      } catch (error) {
        console.error("Invalid message received:", error);
      }
    };

    window.addEventListener("message", handleMessage);

    return () => {
      window.removeEventListener("message", handleMessage);
    };
  }, []);

  const headers = useMemo(
    () => (data.length > 0 ? Object.keys(data[0]) : []),
    [data]
  );

  if (data.length === 0) {
    return <div>No data</div>;
  }

  return (
    <Table>
      <TableHeader>
        <TableRow>
          {headers.map((header) => (
            <TableHead key={header}>{header}</TableHead>
          ))}
        </TableRow>
      </TableHeader>
      <TableBody>
        {data.map((row, i) => (
          <TableRow key={i}>
            {headers.map((header) => (
              <TableCell key={header}>
                {typeof row[header] === "string" ? row[header] : "N/A"}
              </TableCell>
            ))}
          </TableRow>
        ))}
      </TableBody>
    </Table>
  );
}

Here's an example of how the data should look:
{
  type: 'data',
  data: {
    span_id: 'd42cbeb6-aaff-43d6-8517-99bbbd82b941',
    input: "Some input text",
    output: "Some output text",
    expected: 1,
    metadata: { some: "additional info" }
  }
}

Use this sample span data to illustrate how the table will look:
ID: initial-sample
Input: An orphaned boy discovers he's a wizard on his 11th birthday when Hagrid escorts him to magic-teaching Hogwarts School.
Output: Harry Potter and the Philosopher's Stone
Expected: Harry Potter and the Sorcerer's Stone
Metadata: null

Make sure the Zod schema is flexible for different data types and make sure all the properties from the message are included. Also be sure to handle any undefined values.
3
Townie will generate some code for you and automatically deploy it to a URL. Check it out and make sure the table looks how you’d like, then copy the URL.
4
Lastly, go back to Braintrust and visit the Configuration tab of your project, then navigate down to the span iframe section. Paste in the URL of your hosted table.Configure span iframe
Now, when you go to a span in your project, you should see the table you created, but populated with the corresponding data for each span. Rendered table iframe

Example code

To help you get started, check out the braintrustdata/braintrust-viewers repository on Github, which contains example code for rendering a table, X/Tweet, and more.

Tune performance

Configure SDK behavior with environment variables for your deployment needs:
  • BRAINTRUST_SYNC_FLUSH: Set to 1 to flush synchronously instead of in background. Useful for debugging but impacts performance.
  • BRAINTRUST_MAX_REQUEST_SIZE: Maximum batch payload size. Defaults are tuned for AWS Lambda.
  • BRAINTRUST_DEFAULT_BATCH_SIZE: Maximum number of log messages per network request.
  • BRAINTRUST_NUM_RETRIES: Network retry attempts before failing.
  • BRAINTRUST_QUEUE_SIZE (Python): Maximum logging queue size. Additional logs drop oldest elements.
  • BRAINTRUST_QUEUE_DROP_EXCEEDING_MAXSIZE (JavaScript): Cap queue size and discard additional elements.
For debugging, save failed or all payloads to disk:
  • BRAINTRUST_FAILED_PUBLISH_PAYLOADS_DIR: Directory for failed payloads
  • BRAINTRUST_ALL_PUBLISH_PAYLOADS_DIR: Directory for all payloads

Next steps